update 1-11-2022: “Surprisingly” there seem to be extremely favorable reviews of this shredder on youtube. Interestingly some of those reviews claim “to not having been sponsored by the manufacturer” and therefore imply “objectivity” – while providing direct online shop links to sellers of this product and admitting that they might receive affiliate kickbacks for sales made in those shops.
One might be tempted to think that eventhough the financial incentives of the authors of those videos obviously go into a certain direction, the exclusively positive comments below those videos actually reaffirm the review result, right? Not so quick! I just learned that censorship on youtube cannot not be underestimated. To add some balance I had just left a link to my less than positive review (see below) on one of those pages (see https://www.youtube.com/watch?v=1y410OOy_E0 ), only to find that after a few minutes my comment had already been removed. You might want to keep that in mind when you watch fanboy “product reviews” on youtube.
————————————————————
The “Bosch AXT 25 TC” shredder supposedly is “extremely fast” and deals with branch diameters up to 45mm. So much for the advertising claims.

Here the flaws that I encountered during my first year of using this toy:
- Maybe the tool is “extremely fast” if compared to a sloth. In fact it takes ages to process branches through the small input opening.. it is anything but fast.
- The tool is of such poor build quality that it actually started self-destructing the metal casing of the “turbine” (see photo above: a large metal section has actually broken off – this happened while shredding normal branches well within the specified range!)
- The “child-proof lock” of the tool malfunctioned after a couple of weeks and the whole shredder had to be sent in to repair the electronics. Luckily this was still on warranty. Next time this happends Bosch will likely sell me the tiny replacement circuit board for 80 Euros apiece. (At least this incident gave me the “opportunity” to have a look at the steep prices Bosch asks for the various spare parts.)
- It took not long for both of the wheels to fall off. Each is normally held in place by a cheap plastic bolt – which breaks in no time..
- In any case the wheels are pretty useless in most circumstances: The wheelbase is much to narrow and the center of gravity much to high so that the shredder will invariably tilt over whenever you try to move it – even on flat terrain.
At the time I had bought the shredder for around 500 Euros. It isn’t worth the money, not at all.
Update 2018: So it happend again.. the previous day it had still functioned.. next day the Bosch shredder was “dead”. When trying to repair it myself this time, the root cause was quickly found: One of the “child-proof switches” (which checks if the feed hopper is actually screwed on) was barely recognizable as a switch – it had completely disintegrated/melted. As soon as I shorted the repective wire and cleaned the PCB (see below) the shredder worked again. Since I had already opened the device I decided to keep going to also sharpen the dull blades. Here the additional findings about this piece of junk that Bosch calls a shredder:
- It is a major pain in the ass to disassemble this piece of junk. One problem is the removal of the plastic cover (to access the motor, etc): There is one pin in an almost inaccessible position under the cover and it must be removed before the screw that blocks the cover can be removed. The plastic cover must be bent considerable before the pin can even be reached. Alternatively the similar pin located on the “red knob” side can be pushed out to then pull off that knob – the ticky bit is to find a nail with a suitable diameter to do the pushing. Another example of Bosch’s “serviceing unfriendly” design are the 6 torx screws that hold the respective black cover from the underside of the device: Apparently for no good reason has Bosch added narrow tubular collars around those screws which means that you’ll not be able to reach those with your exchangeble bit-holder based screw driver. Reassembly is even more fun 🙁
- The lack of proper dust/dirt protection for the printed circuit board (PCB) of the shredder seems grossly negligent: When I opened the compartment there was a thick/moist layer of dust covering the complete circuit board. No surprise to me if those electronics malfunction. (Bosch seems to have used some kind of lacquer to add protection for some components on the PCB – but this looks like a hack to fix the underlying dust/dirt issue.)
- The solder joints attaching the wheel shaft to the chassis were actually *all* broken (not rusted but just broken). I would not manage to create such a lousy quality solder joint even if I tried very hard.
- The blade-turbine can only be accessed (e.g. for replacement or maintenance) when the motor-unit is first completely removed from the device. It seems that Bosch does not mean for this shredder to be serviced with ease!
- Of the four screws holding the blade-turbine, one had already broken off – with only the stump still visible in the screw hole (see photo below). But when I removed the remaining three screws it became apparent that all but one were already broken somewhere in the middle and were barely holding on with what little remained of the screws. Update 2-11-2022: A friend (who is a professional mechanic) had kindly removed the broken off screw parts from the holes eventually (without a suitable drill press repairing this kind of problem likely exceeds the capabilities of most users) and provided me with four high-quality replacement screws – but these screws also started to again break a few month later. To me this suggests that the respective 4 screw design chosen by Bosch is just not adapted the forces provided by the motor/gearbox.

In my opinion the build quality of this badly designed, self-destructing piece of junk is a shame and Bosch did everything to ensure that broken stuff cannot be easily/cheaply repaired.
update 1-11-2022: below some tips that may or may not be useful to other users of this garbage product.
A repeated source of malfunctions were defects of the various “safety switches” used in my device: The device uses redundant mechanical and Reed (magnetic) switches to make sure that the motor “cannot” be accidentally started while any components that prevent direct access to the cutting turbine are not properly installed (i.e. leaf collection box, feed hopper). Obviously the cutter turbine may potentially cause very serious injuries and you don’t want have any limbs near it while it is turning (you wouldn’t want to put your hand into your kitchen blender while it is running either – in spite of there not being a “is the lid on” safety switch in most of those devices). Depending on who might have access to the device (children, etc) you might still want to leave the shredder’s safety switches intact!
That being said I think there are other ways to handle the device safely without those safety switches (provided you can restrict access for unautorized users and you don’t intend to sell the device to unsuspecting new owners eventually), e.g. I always *unplug* the device before moving it or before performing any manipulations anywhere near the cutter turbine. When I see that the respective original mechanical switches just melt/disintegrate or that Reed switches fail due to the counter-magnet falling out (etc), and if I consider the ludicrous spare part prices asked by Bosch, and if I then take the “servicing unfriendly” design into account (that makes any repair just a pain in the ass), I see more benefit in removing unnessary failure points that provice little added value to me. Example: Reed switches are designed to provide little resistence (I measured ~0.7 Ohm) while in the “happy” configuration, which means that in order to disable them completely from my experience it is good enough to just short the respective connector. With those sensor wires out of the way this has the added benefit of making the next disassembly/assembly a bit easier. (The two mechanical “safety switches” are wired in series to the two outer pins on the connector that connects to the mains power. These switches can be similarly disabled by just shorting the respective wires.)
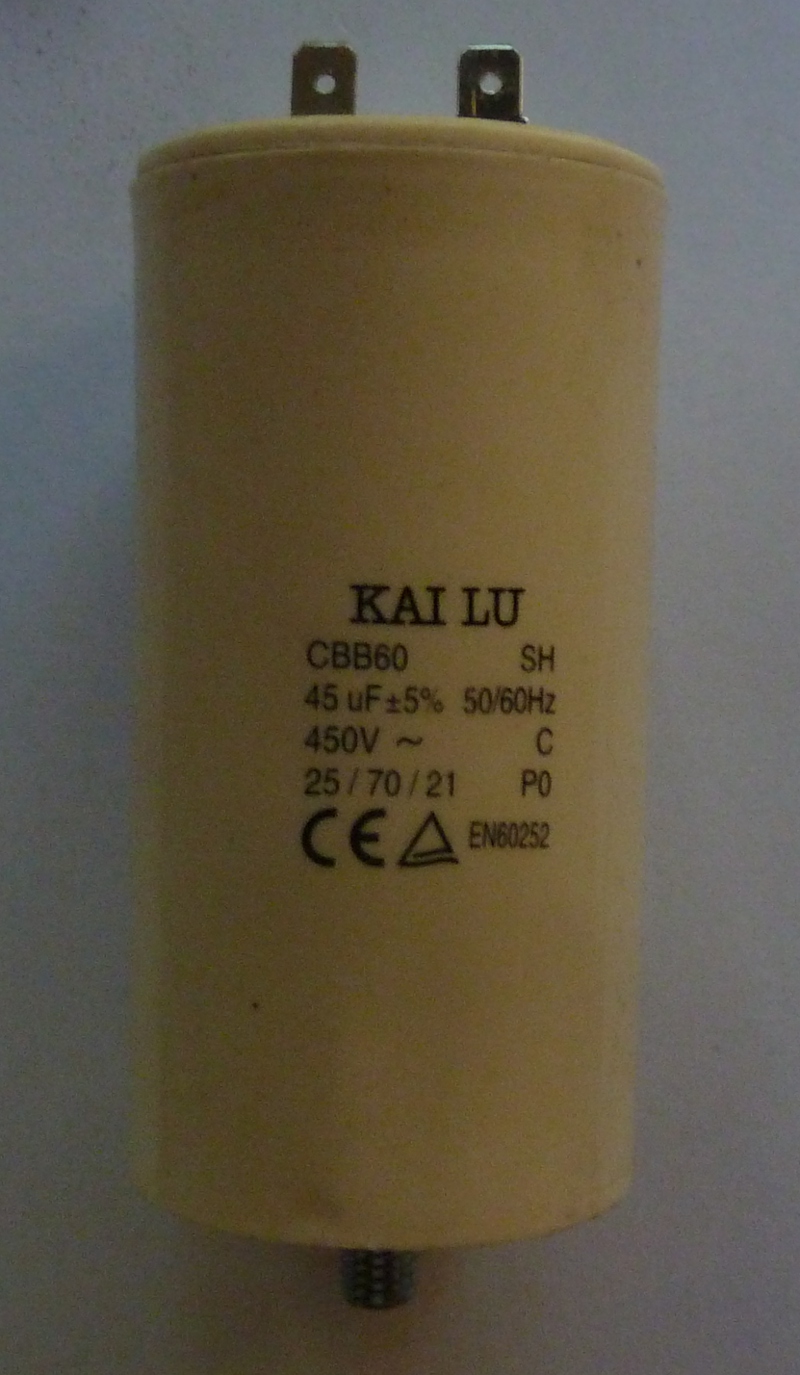
In case you ever need to change the motor capacitor: The capacitor is screwed in, i.e. you turn it counterclockwise to remove it. The component used in my shredder was a: KAI LU, CBB60 SH, 45uF +-5% 50/60HZ, 450V ~ C, 25/70/21 P0 (see photo below). Those things sell around 7-15€ Amazon/AliExpress and there is probably no good reason to pay the inflated “original Bosch” spare part prices.
My device recently started to show erratic behavoir, i.e. it would suddenly no longer turn on (after having run for the previous hour) – just blinking the green led instead. After some month in the garage it would again work just to fall into the same pattern after some use. I measured the capacitor and found that my original part had degraded to a point where it only had 35uF (instead of 45uF). Unfortunately replacement with a new 45uF capacitor did not help. I suspect that it is a problem with the main control PCB – which probably self destructed (once again) – see respective similar issue that had occured to my device during the warrany period. Unfortunately respective schematics for this main board are nowhere to be found and depending on what is broken it might be difficult to fix (e.g. Bosch does not seem to provide the firmware used on the PIC16 micro processor either – i.e. you’d have to make a firmware backup from your respective device while it still works).
Since I had already disabled all the “child safely” features, the control electronics provided very little added value to me anyway. I therefore decided to also get rid of this error prone failure point on my device and just replace it with a simple but robust mechanical switch. A respective “Rotary Cam Selector Switch” (3 positions, 3 phase 12 terminals) allows to turn on/off the motor while also selecting the direction.

And “hurray” now my garbage Bosch shredder works again. The hack comes with a tradeoff though: The motor is no longer turned off / reversed automatically when something blocks the cutter turbine, i.e. the respective intervention has to be performed manually and reasonably quickly.
In case you want to try this hack yourself here some information that might be useful (USE AT YOUR OWN RISK! THIS INVOLVES HIGH VOLTAGE COMPONENTS THAT MAY POTENTIALLY CAUSE SEVERE INJURY AND/OR DEATH. WHEN IN DOUBT THEN DON’T!):
Precautions:
1) Always unplug the device before tinkering with the electrical parts!
2) The main motor capacitor may still contain a significant/dangerous charge even after the device has been unplugged: Do not touch any electrical components before you have also verified that the motor capacitor is COMPLETELY empty! (You might use a well isolated electrician’s screwdriver to directly short the two terminals of the capacitor. Make sure that your body is NOT involved in any way in the shorting of the cap! THIS IS DANGEROUS!)
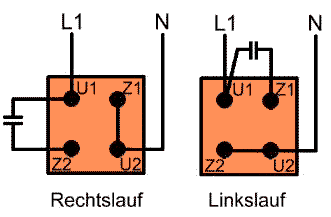
The motor contains two independent coils: the main coil (blue/yellow wires; corresponding to U1/U2 in the below diagram) and a starter coil (red/white wires; corresponding to Z1/Z2). In case Bosch has changed the coloring of the wires you should verify the resistance of the respective coils: the resistance of the starter coil should be about twice the resistance of the main coil.
Wiring is pretty straight forward and respective background information can be found here: https://www.elosal.de/ratgeber/drehrichtung/index.php . This is what the respective circuits must look like in order to make the motor rotate in one or the other direction.
Hi,
bought the Bosch AXT 25 TC little over one month ago. We could use it for about 45-60 minutes the first time and then it refused to start. The day after it worked again. One week later, same problem but now it worked only about 20-30 minutes before resisting to start again. We have cleaned the shredder every time and it still refuses to work the same day. The green LED is flashing but it does not restart. Yesterday it did not start at all. We thought it might be the temperature – about 30 degrees right now in Stockholm – and some kind of overheating sensor kicking in. This morning it started. “Yes it works again my wife said” and pushed the red button to turn it off temporarily and to get the branches. Then she tried to turn it on again. Noop, it refused to start. I will go back with the shredder to Hornbach that sold it and ask for a refund. I don’t want to have this brand new malfunctioning machine. Probably they will refuse and an endless repair process will ensue. It will be many visits back and forth to Hornbach unless this piece of equipment just was a “Montagswagen” to use the german word for lemon car. I will keep you updated.
I bought in December 2013 an AXT 25 TC garden shredder and used it only for my own garden . I am not a professional gardener but 25 months later is the gearbox of the shredder completely damaged. Very frustrating and expensive. The engine of the machine is so powerful that it destroys the gearbox . I can send pictures that shows the problem if you want .
Don’t buy this expensive self-destructing machine .
Danke für die Information. Kann ich Ihre Informationen teilen?
sure
Agree. I have had mine for a few years (I don’t use it a lot) and then discovered the “contre-lame” (the piece that is supposed to sharpen the blades) had broken. The machine is supposed to cut out if something too hard gets in, which never happened as far as I’m aware, anyway the “contre lame” surrendered before the machine could ever cut out. This is a spare part that should be replaced every once in a while i.e. should be easy to replace, hadn’t it been that Bosch fixed it with only one (1) screw, so insanely tight (or possibly because of the machine movements) that it was impossible to loosen, not even with an Xout.
I checked out the Powertools After Sales service site about what to do. In theory I could replace the “contre lame” together with the carter and the piece on top of it, a screw and two gaskets, about 120 Euro in total. When I put it all in the basket, still hesitant because 120 Euro easily pays you a low cost new shredder, the site said none of the parts were available. Mind you this thing is still new available at any major gardening store…
Impossibly heavy and unstable, slow, annoying noise and not sturdy enough for the insane amount of torque it produces. Another throw-away product.
Just under 3 years old, used moderately. Start of this season saw blinking lamps and no turning of turbine. Disassembled entire unit (there is a helpful Dutch or German video on this), cleaned and inspected especially turbine assembly. Troubleshot to best of ability safety switches with ohm meter. 6 hours later, no turbine function though now 2 different error lamp sequences depending on how hard the collection bin is slammed home.
– difficult to troubleshoot as it is uncertain whether safety switches are malfunctioning or if it’s the entire circuit board.
– no point in paying € 100+ for new circuit board
– after reading above comments I think I’ll have to deep 6 this unit and try something else.
– € 600 and a trip to the dump.
[updated 21-feb 2023] If you are lucky then one of the safety circuits is still malfunctioning: Before sending it to the trash I would first try the quickfix to completely bypass both of the “Reed” switches (see my respective PCB photo) and if you have a multimeter you might check the capacitor (see precautions in my main post). Only if that doesn’t work then it is probably a defective PCB.
Just bypassed the two Reed switches on my second-hand shredder, problem solved. Thanks for the info.
I have had mine 5 hours, unpacked, started a meal, and got the shredder to beep and wink green lights. I have located the Collection Box microswitch but not found the one for the Chute Assembly. So far nothing has turned.
Reired to the computer to see what others have found.
Hi John,
You can check my comment. This may works for your case.
Hi,
Greetings from Turkey. I would like to share my experience for the case that the machine beeps also two lights blinking and the machine does not start.
First of all, I would like to say that the machine controls 2 parts for safety, namely collection box and chute assembly. Each of the parts are double checked with a mechanical switch and a magnetic sensor. By expressing electrical circuit terminology, a magnetic sensor (or we can say a magnetic switch) has a serial connection to a mechanical switch. Thus each switches should be in proper position for the machine to start.
After the explanations above, here is my experience: when my machine didn’t start while beeping and also two lights blinking, i realize that the magnetic sensor on the machine just above the collection box didn’t receive an input from the metal or magnet located within the collection box. (Sorry but i cannot add picture and it may be a bit confusing without some pictures). You can see a metal rod in the rear of the collection box. you can easily see the metal rod when you look above to the rear of box. That metal rod is the mating part of the magnetic sensor located on the machine. You can check the magnetic sensor from the chassis of the machine, by considering the position of the metal rod on the collection box.
Now here is the magic; just remove the metal rod from the collection box and placed it just below the magnetic sensor located on the chassis of the machine. Don’t worry, the metal rod fits to the channel of the magnetic sensor. you may get the rod very closed to the sensor. the difference might be between 5-10 mm.
After performing this modification, my machine started working and i haven’t had the same problem again.
This may solve Chris’s and Patrick’s problem also.
Cheers.
Hello!
I bought a second hand machine in condition for spare parts. It had the chute magnet broken off the chute and two lights are blinking together with beeping sound. So the machine doesn’t start. I brought a new chute, tried also what you say with the collection box magnet, but the machine still beeps, blinking 2 lights and doesn’t start as before. Any other suggestions will be appreciated! Thank you!
[updated 21-feb-2023] I would say that beeping most likely means one of two different things: either the PCB is defective (and you’d need a ~ €70 replacement part from Bosch) or one of the child-protection “safety (Reed) sensors” isn’t functioning as expected (which can be fixed rather easily DIY style). (I am not sure if the electronics might also detect a degraded capacitor. This wasn’t ever relevant on my device but it doesn’t hurt to measure the capacitance to check that it’s not dead.) If you decide to open the device make sure to unplug the mains power and to safely uncharge the capacitor before you get in contact with any of the wiring (see my main post)!
If I remember correctly the device checks 2 things: 1) the bucket is fully inserted (there is a switch that triggers when the bucket is completely inserted under the device; this switch is visible below the power cord socket while the leaf collection bucket is removed) 2) the top is screwed on tightly (there is a mechanical switch that triggers when the top of the device is fastened using the black knob on the side – you’d have to remove the black device cover to get at this switch)
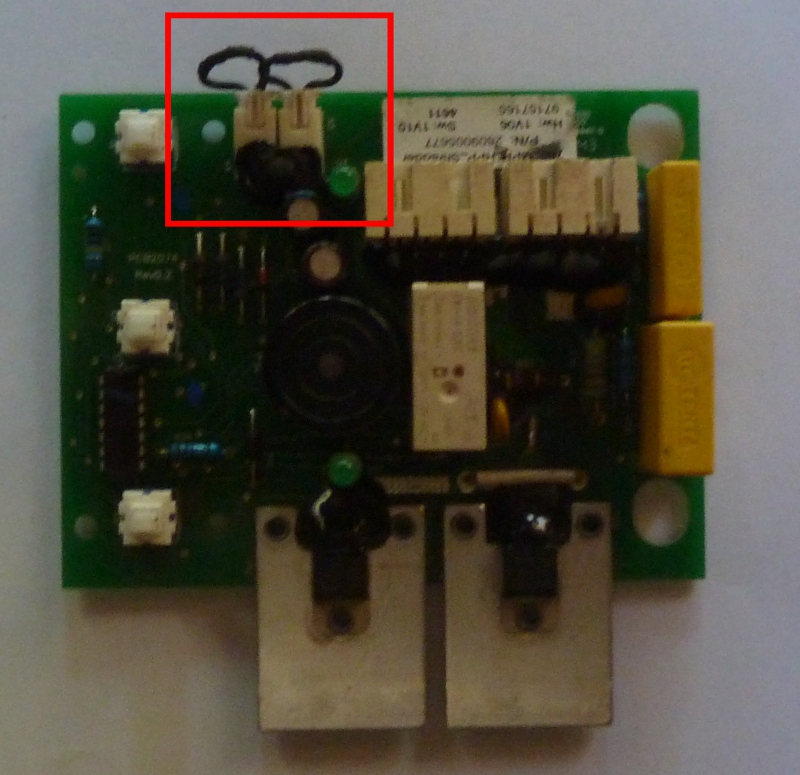
The two checks are implemented redundantly using be above mentioned mechanical interrupter switches as well as additional magnetic (Reed) switches. While the magnetic switches connect via two dedicated little connectors to the PCB (see red boxes on photo), the mechanical switches just interrupt the connection to the mains power.
If there is a problem with the magnetic switches then the device would typically beep and/or flash some LEDs but if one of the mechanical switches is broken then the device will just appear to be completely dead (since it is in fact disconnected from the mains power).
Each one of these garbage mechanisms has failed on my device over time – preventing the device from functioning for no good reason (unless the user is a complete idiot or has small children playing with the shredder). I will not make any recommendation here but all the “sensors” can be easily disabled by directly shorting the wires that lead to them – a convenient place for the 2 magnetic switches are the connectors on the circuit-board (shorting these like I showed on the PCB photo may solve your problem – unless your PCB is defective). If I remember correctly the wires to the two interrupter switches are wired in series to the outer pins on one of the two larger PCB connectors (check black wires?) and shorting those 2 leads will simulaneously bypass both of these switches (not relevant for your case but I am mentioning it for the benefit of those readers that might have different symptoms on their device).
Do you have a diagram/ photo for this please?
I don’t have any wiring diagrams and the only relevant photo I have is the one above with the PCB, which shows where the wires from the two magnetic switches/sensors connect to. I have thrown out all that garbage a long time ago so it is too late for me to take any new photos. (I added some clarifications to the orginal post)
Hi Korey, You saved my day explaining about the magnetic sensor alignment. I had the exact same problem with the beeping + blinking leds but turbine not starting. Aligning the magnets fixed the issue ! Incredible that Bosch can’t spend resources to explain it properly in the user manual.
I’ve found this machine to be fairly reliable and good at dealing with fairly chunky branches. However the reed switch for the chute did detach and make the machine inoperable. I just bypassed the switch (not recommended) and have not had problems with that since. I have also found that the bin often moves during operation which can cause the machine to stop if the reed switch on the bin becomes deactivated – which can be a bit annoying!
Just has mine pack up. Removed the magnet from the hopper and glued it to the read switch at the rear. Job done it works again so lucky escape. Not been all plain sailing as it toppled over in the back of the van and snapped the chute off. Some plastic welding with a soldering iron and back together again. I have removed the finger chute guard section which makes it so much easier to feed branches into it but it does increase the risk of minced fingers so extra caution required but I guess if you use your hand to push stuff into a shredder then your an idiot and shouldn’t be allowed to use sharp scissors. It’s out of warranty but it’s been a god send as its seen lots of use.
My issue with this is that the green light is blinking as it’s supposed to, no beeps, but it won’t start.
If I remove the collection box it obviously starts to beep.
If I remove the top cover, it starts to beep.
I removed both those magnets just to check.
– With the collection magnet held up to the chassi magnet, it stops to beep (when pressing the buttons).
– With the top cover, both lights are blinking and beeping when pressing the buttons, no matter how I hold the magnet.
I can hear a click when pressing the buttons in consecutive order, pressing the same button twice wont produce that click.
Busted motor?
[update 21-feb-2023] My device had meanwhile fallen into the same pattern that you describe in our post. I verified everything and eventough my capacitor was degraded (only 35uF instead of 45uF) my motor worked fine once I eliminated the broken garbage BOSCH electronics – by switching to my current “all mechanical” configuration. (CAUTION: See precautions in my post before you tinker with any of the electrical wiring inside of the device!)
So from my limited personal experience I’d say that once the Reed switches are out of the equation (in your case the “beep experiments” you performed suggest that they work fine; a reliable way to check is to measure their resistance where they plug into the PCB – unlug and use a multimeter on the plug) the most probable suspect is the PCB (by a very large margin), then the capacitor and at a very distant third place comes the actual motor wiring (the 2 motor windings are exposed separately on the respective PCB connector and they can also be easily measured/checked there using a multimeter – see my main post).
Thank you for this blog. I have managed to persuade Amazon to collect and refund me for this shredder. I bought it 23 months ago and I’ve only just it twice in that time. I tried to use it again today and it beeping at me. The booklet that came with it suggested that the feed hopper or collection box wasn’t fitted correctly. This was utter nonsense as it’s such a simple assembly. I rang up Amazon stating that I’ve found articles online suggest that faulty safety switches are a regular occurrence within product. They are picking it up in three days tone and will issue me with a full refund. Thanks again.
Hi,
I hope you can help me.
I send my shredder for repair, and what happened is that they couldnot find the problem and returned it to me as a building kit, also cutted of all wires.
I am trying to put it back together, now I see that the safety switch at the container is broken, and the connecting part of the switch is gone.
Without that I am not able to find out how this switch has to be connected.
All wires were cut, I am able to see how to reconnect them, but I have no idea how this switch behind the 220V plug was connected in the wire diagram. Cannot find a wire diagram on the internet.
I hope you can tell me how to connect a new switch .
I think the idiots that failed to diagnose your device had no right to further destroy it by cutting any wires and they should be held responsible for the damage that they added. Was this the original BOSCH repair service or somebody else? (if I remember correctly most of the wires in this device are colored and if no parts were stolen, then it should not be too hard to reconstructs what went were..)
Based on your description I do not understand which parts of your device are actually missing and which ones might still be good (what exactly had been the problem before you sent it in for repairs?). Also I don’t know how experienced/comfortable you are with DIY electrical work and I find it therefore impossible to give advice adapted to your specific situation. As I explained in my article I threw out all the original electronics as a final device improvement and I therefore can no longer look up anything with regard to BOSCH’s original garbage wiring. (I am still very happy with my respective simplified solution and can recommend it to anybody who has the required DIY electical work equipment/experience.)
With regard to the switch that you mention the only information that I still have is what I had originally written at the time: “The two mechanical “safety switches” are wired in series to the two outer pins on the connector that connects to the mains power. These switches can be similarly disabled by just shorting the respective wires.” I guess you might be able to restore the original configuration by following the wires that come from those “two outer pins” of the connector on the circuit board: both of these should ultimately connect to the phase/neutral pins of your mains power socket – but while one of the two will make that connection directly, the other one should be interrupted by the two mechanical switches, i.e the wire should first go to one then the other of the two switches.
Before you reconnect anything I would recommend that you benefit from the cut wires, since those should allow you to make measurements of isolated parts of the circuitry: Measure (and note down) the resistance of your motor windings (i.e. measure between any of the wires that go into the motor – these are actually the ends of two wires so you should only get readings for some of the combinations). Measure the capacitance of the capacitor. This will tell you if the device would still work – except for BOSCH’s garbage electronics, i.e. if the device could actually be fixed without buying a new motor.
Agreed. Mine worked for some years, but has now stopped and the turbine is completely jammed Tried a 1.5m crowbar but cannot move it
“There is one pin in an almost inaccessible position under the cover and it must be removed before the screw that blocks the cover can be removed.”.
I cannot find the pin. Well, I will look again, but I cannot find the *** thing. Why so difficult, because then you have to ask BOSCH to repair it for you.
Instability 100% I am 1.88M tall and weigh 120kg. I have nearly broken my wrist trying to move the thing short distances as it falls over for no obvious reason. I realise the weight is at the top but a wider wheelbase option would be very useful, telescopic axles perhaps
Thanks for your work here, glad to know I am not the only one who feels as you do.
..Regards, Bob
I meanwhile found that there is a second pin that is more accessible and somewhat easier to remove. It holds the red plastic knob on the axis. Look into the small gap between the knob and the device cover while you turn the knob. At some point you’ll see a small hole (2-3mm) in that hidden part of the knob’s plastic. There is a spring pin in that hole that goes through the axis to hold the knob in place. Use a suitably think nail to push it out (finding the right size nail is somethat tricky since the pin is hollow and nails that are too thin will just pass through it and not do the job.). Once that pin is out, the knob can be pulled off the axis (This may take some prying the first time and you might want to use a bit of hot air to somewhat soften the plastic). Once the knob has been removed the device’s respective cover can be removed to get to the inner parts of the device.
Sounds a bit as if the 4 flimsy screws that hold the cutter turbine might have broken causing the turbine to get out of alignment and get stuck in its enclosure. You’ll have to completely pull the motor/gearbox/cutter assembly from the green plastic casings to get to that part (You’ll probably need to undo some of the wiring too since some of the wires are too short and limit how far you can pull the motor from the plastic casing.). Make sure to take detailed “before” photos so you remember where everything has to go for reassembly.
Hello, my machine keeps beeping and blinking with two leds. Can I ask about bypassing reed switches and Your picture? I looked at picture,so I cut reed switches wires with scisors and connected always left with right for each of these two connectors. Is it so ok? Because it doesnt help me,unfortunatelly. I dont understand it because I worked with shredder,stopped it and immedieatelly after that it stopped to work. Thanx a lot and best regards Vladi
As far as I can tell, shorting the reed switch wires like you did is correct. Since this did not solve the issue on your machine it still might be one of the mechanical “safety switches” (i.e. the one below the main power socket that also checks if the leaf bucket is fully inserted, or the 2nd one that checks if the top of the device is completely screwed on). If one of those two switches is defective the respective wires can also be shorted as a workaround. Worst case is that the control PCB is actually broken – which seems to be a common failure point of these garbage devices. (I am glad that I replaced the Bosch junk electronics with a meachnical switch – so I don’t have to bother with that kind of annoying crap anymore 🙂 )
I thought probably wrong that those two black wires I have cut are exactly wires from this mechanical switches and they shouldnt work anymore..: ) This mechanical switch is good idea if u work with shredder carefully. Neverthelles I cannot also imagine that PCB can fail so suddenly but truth is that smth has happened with shredder very quickly after stopping.
So at the end I will probably finish this story with replacing bosch electronics with 3-phase cam switch which is nearly the same as yours one(L-0-P). Can I ask You if You used exactly schema from here? https://elosal.de/media/image/storage/opc/einphasenwendung.jpg
The right sides lines next to numbers (1-10) are wires how to bridge switch jumpers? Thanks.
Recap of “your” image: The shown rotary switch is basically a stack of 5 separate switches, each of which has 2 associated I/O terminals (that belong to exactly one of these 5 switches, e.g. “first row switch” handles the connection of terminals 1+2, the second those of terminals 3+4, etc). Each switch has 3 positions: “1”, “0” and “2” (see respective columns on the right hand side of the image; each row represents one of the 5 switches and the “X” signifies that the respective terminals are “shorted” in that switch position – no terminals are ever shorted in the “0” position). Make sure to use a multimeter to verify the layout of the respective terminals on your specific switch!
In addition to motor and mains power wires that go into the terminals (see left side next to the 1-10 numbers), additional wire bridges are indeed needed between certain terminals (see right side next to the 1-10 numbers).
I think that the image is at least incomplete (e.g. it only shows one end of the capacitor as “C” – but not the other end which should probably be permanently connected to L1; note: this capacitor has no polarity, i.e. the orientation does not matter). I might have used this image for inspiration but I guess that I had to adapt it to the somewhat different “row” layout of my switch anyway. I cannot say if the wiring shown in this image is indeed correct and would strongly recommend to first use some standalone/dummy (N, L1, C1, C2, Z2, Z1, U1, U2) wires to verify that the switch makes the correct connections (in whatever wiring you might end up with) via a “continuity test” using a multi-meter: Make sure that exactly the correct connections are made in all 3 switch positions – and that no additional connections are made (before you hook up the actual mains power / motor wires!).
The image at the end of my original post definitely shows the correct “result” wirings that you’ll need to achieve and I primarily used that one to verify what my switch was wired correctly. When you look at “your” image the bottom “row” (switch) serves to completely cut the power to the device while it is in the “0” position, whereas the upper 4 rows “reconfigure” the motor wiring to control the direction that the motor turns. If you look at the image at the end of my original post you’ll see the “reconfiguration” requires 2 connections to be “moved” (and this is what the 4 top row switches in “your” image do): The capacitor from U1 must be toggled between Z2/Z1 and a wire connection from U2 must be toggled between Z1/Z2.
So white wire in my case is coming from capacitor. That would indicate that there is only starting capacitor connected serially with starting coil and after start it s disconnected.through some centrifugal clutch. For rotation changing is enough to change red and white wire from starting coil that actually enables rotation change. And of course to find appropriate wiring on my 3P switch, but I I think have already one functional, have to test with bulbs.: )
The two capacior wires are typically white. There is no “centrifugal clutch” and the capacitor stays statically connected as shown in the respective diagram at the end of my original post (even when the motor is turning): There is one hard wired configuration that makes the motor turn in one direction and a different configuration to make it turn the other way (when starting from a state where the motor did not turn). The switch toggles the wiring between the two configurations (and cuts the power supply while in the “off”/”0” position).
So this capacitor is starting or running?
see https://de.wikipedia.org/wiki/Kondensatormotor (use google to translate): The capacitor is required to create/maintain the proper rotary field that makes the rotor turn. Without that capacitor the respective field would be “incomplete” and it would fail to get the motor to even start. (Once the rotor is turning, the inertia of the rotor would probably allow the motor to keep going even with a respective “incomplete” field – but the motor would likely lose power with a respective “incomplete” field. In case you want more information on this topic I suggest you contact an electrician – which I’m not.)
Exactly and there are more types of motor wiring: ) In some configurations it’s not necessary even to use starting capacitors, u can achieve it just with appropriate wiring(thinner wire with more resistance) of starting coil, but it s a rare case for some usages. What I have seen is, that the starting coil is always used only during start for phase move and motor starting, then is always switched off and after that is used just running capacitor with lower capacity. But in this bosch motor I can see just one capacitor, so according that I thought it s the starting one. I havent dismantled it fully but I can live with that, that I know which wires to switch to get different rotation..: ) But I m still waiting for connectors, they should come tomorrow…: )
I thought probably wrong that those two black wires I have cut are exactly wires from this mechanical switches and they shouldnt work anymore..: ) This mechanical switch is good idea if u work with shredder carefully. Neverthelles I cannot also imagine that PCB can fail so suddenly but truth is that smth has happened with shredder very quickly after stopping.
Thanks for all these information !
I’m the proud owner of a AXT25D which is such a piece of shit that I thought buying the TC version would make my life less miserable.
Apparently not !
My problem is that for an hour of using it, it actually shreds 20 minutes, the other 40 minutes are dedicated to unclog the shredder.
If you make it too tight you can’t shred fat branches, if you make it loose the tiny branches start to turn around the drum.
Never had an electric problem though but yes on of my wheels is gone and the balance of the machine is terrible !
I’m curious if a woodchipper this expensive is so unreliable is there a different one that you recommend instead? The Ryobi RSH3045U for example seems to be easier to open up to clean / repair / replace parts. But I don’t know, maybe most devices these days are design with planned obsolescence.
Unfortunately I have no recommendation. I suspect that other “consumer market” products might indeed be similar low quality toys, and it might be better to look for recommendations from professionals like landscape gardeners that depend on reliable tools to run their business.